 The Graywolf Survival field-expedient solar panel powerbox
Unless you’re one of the stubborn idiots who think that in a TEOTWAWKI (The End Of The World As We Know It) situation there won’t be any electronics that survive so there’s no point in ever coming up with a viable solution in the meantime, you probably want to be able to have electricity available no matter where you’re at. With what I’m going to show you, you can do just that. And, you won’t have to spend almost $2,000 for something like this beauty (although that thing is certainly on my Christmas list. Hint, hint).
Now sure, that thing would be hella awesome to have if SHTF and could run all the smaller things you’d need (ham radio, CPAP machine, portable electronics, lights, etc), but it’s 2 freaking thousand dollars. It’s not too difficult to make something like that for a lot less. Keep in mind that I built this particular kit just from stuff I had lying around the house. If I were trying to build one to spec, I would have changed a few things around. A lot of it comes down to your power requirements. Your battery needs to have enough amp-hours to run your inverter at the level it does while it’s running your equipment. Your solar panel needs to have enough power to replenish that usage using only the sun it can, which is about 5 hours per day – more in cloudy places. Your charge controller needs to be efficient and be able to handle the power it’s given.
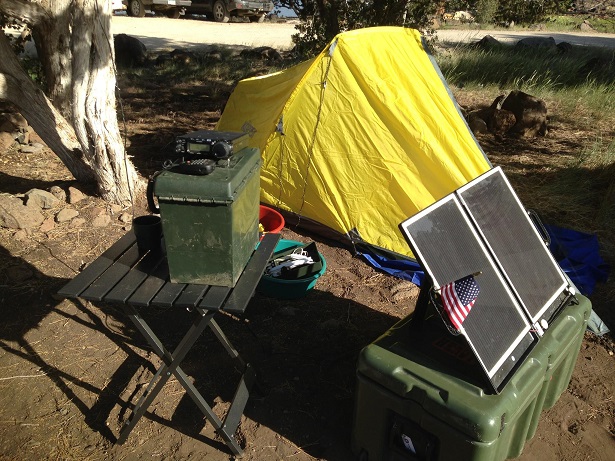
I recently went camping with a dozen of my neighbors up to Northern AZ out next to a lake. I have cool neighbors like that. A couple of them had never been camping so they weren’t exactly sure what they were getting into. I thought this would be a perfect opportunity to come up with some kind of portable, regenerating system that could do things like power their air mattress pump, charge their cell phones and have backup lights for the area. Plus, I wanted to bring my Yaesu FT-857D ham radio along since I haven’t had a chance to play with it since I got back from Afghanistan. The pic above is a shot of my camp area running the ham radio.
Now, for you who think it isn’t camping if you bring electronics, I don’t really give a crap. Having the cell phones wasn’t necessary but it helped with coordinating finding each other and gave us pocket cameras. We didn’t run the music very much but we were in a scrub forest so it wasn’t like we had birds or much nature to listen to. I’ve spent a LOT of time in the jungles of Africa and throughout the Middle East enough to know that I’d rather sleep on an inflatable mattress if it’s available. I don’t enjoy making sure I’m uncomfortable just to prove I’m a man.
The other thing I wanted to do was put it together with things that would be very easy for you people to find, very affordable, and very simple to put together for someone who isn’t mechanically or technically inclined. It also had to be portable. The main point I’d like to get across is that you can easily make things like this, and use it with things you can find just about anywhere.

What I came up with works pretty well. I had no problem running lights all weekend and setting it to charge with the solar panels in the morning. I ran all the pumps, lights, portable electronics etc and even used the 857d as a music radio by just tuning to the Flagstaff radio channels.
If you’re just looking for something to keep your flashlights and cell phone and/or tablet charged, check out my article titled: Almost unlimited power for your camping or bug out bag electronics. It’s even simpler and MUCH more compact.
This post has some simple information, and some fairly complicated information if you’ve never dealt with electricity or electronics. You don’t have to understand everything in it to make one of these boxes. That’s the beauty of making it yourself: you can make it as simple and small or as large and complicated as you’d like, and upgrade pieces as you go along.
All we’re doing is building this:
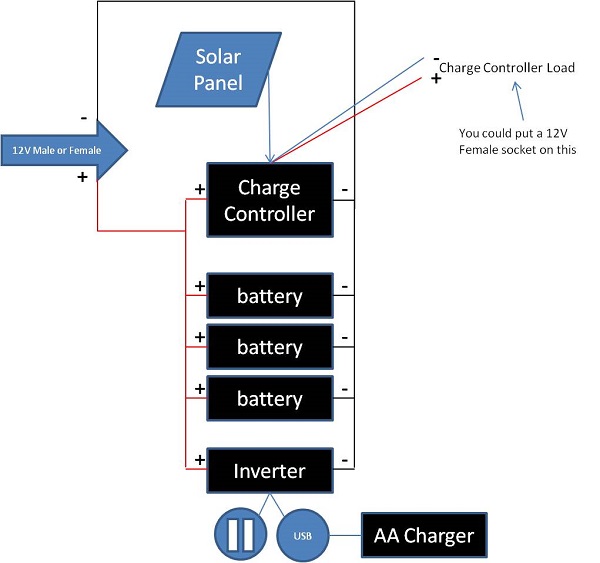
Essentially, as long as you put a charge controller between the solar panel and the battery, and connect all reds to reds and blacks to blacks, you’ve pretty much got it. If you have any questions about hooking something up, just leave a comment below. Make sure also that you stay within the limits of whatever you’re using, and also that nothing can short out inside your box. Here’s the simple version:
- Find a good battery. The best would be for uses such as electric wheelchairs or golf carts, or solar systems. Figure out if the amp hours are enough for you. If not, connect another one to it (black to black and red to red). Keep going until you have enough amp hours. Obviously, this gets very heavy very quickly.
- Connect an inverter to the battery to get AC out of it. If you’re running a CPAP machine or something sensitive to signal, you’ll need a full sine inverter. If not, you can save the money, space and weight by going with a more common modified sine inverter.
- If you want to be able to trickle charge the system, get a trickle charger. You can either hook this up permanently or just hook it up whenever you want to charge the batteries with an AC wall socket.
- Make sure you have a good set of jumper cables for your car. You can use this to charge the box if there’s no sun or AC power available.
- If you want solar power, find a solar panel that works based on the watts or amp hours you want and the size and cost. You’ll need a solar charge controller too with this, and they’re not always sold together. Connect the solar panel to the charge controller and the charge controller to the batteries.
- Figure out what kind of connectors you need to plug into your batteries. You can either connect them directly or get the alligator clamp type if it’s just when you need it. I’d suggest at least getting a female 12V plug that’ll give you the same ability as your car’s cigarette plug will.
- Your inverter may not have a USB output. If you need one, you can easily just get a female 12V socket that connects to your battery and then get the 12V cigarette lighter USB plug to put into that.
- Consider getting a AA battery charger to hook to the system. Try to find one that has a USB input instead of the AC type because it would be a lot more efficient than having to run the inverter to run the AC plug than it would to just run the 12V USB plug mentioned above.
- Get a multimeter so you know how many volts you have and figure out how to fix things if they stop working later on.
- Keep a couple of wrenches in your box that go to the battery connectors you’re using so you can tighten things up and change things around when you need to.
- Find a box that fits all this. You should probably do this last since there are a LOT of ways to do this.
The beauty of this system is that pretty much every part can be swapped out with some kind of equivalent if you don’t have the same things I do. You just have to make sure that the power in, power stored, and power out all meet what you need and that it all fits in the box you pick.
The big thing to keep in mind is that you need to make sure that whatever connector you get will fit into whatever connector you have, or you need to adapt it to what you need. The only fabricating I did on this box was to put connectors on the end of the battery wires with a crimper so the battery bolts would slide in them. Everything else was plug and play.
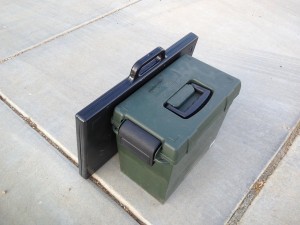
Here’s how the system looks all closed up:
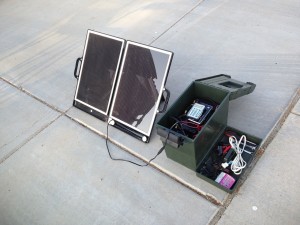
And how it looks when it’s all opened:
The Details
If you click any of the pictures below, it’ll open up the details of that item at amazon so you can see all the specs.
Now we’ll get into the more complicated stuff. It’s not really complicated if you’re looking at one part at a time but all together could be a bit much for some.
There are basically four things to think of when coming up with what parts you need for your powerplant:
-
Power in
-
Power stored
-
Power out
-
Portability
-
Monitoring and maintenance
Power in
AC
It doesn’t do much good to have a box that can only be charged by plugging it into a wall if there’s no wall AC to plug into. That being said, wall power is the most convenient way to charge the thing. A trickle charger is usually the best solution because they’re cheap and small.
- The trickle charger

The trickle charger allows you to plug into your wall socket to charge the box so it’s ready whenever you need to grab it. It’s not a necessary item, and you can afford to get a larger one (so it charges faster) if you just don’t put it into the box. The one I have above works ok but it’s only 1.5 amps so it takes a while to charge the battery (hence the trickle word).
DC
In case you don’t have wall power available, the next most convenient thing is probably DC. There’s usually a car or other 12V power source available. A good pair of jumper cables hooked to a fully-charged or running car works well.
If you wanted to then connect a 12V car connector that goes into a cigarette lighter outlet to that, using the SAE connector, you’d use something like this:

This is not the best option, however, and should only be used to keep up a battery that isn’t too dead due to the current it would draw. In the case above, you’d also have to connect those wires to the battery somehow or find something above that has either alligator clips instead of just bare connectors.
If you do charge the battery using the 12V socket, keep in mind that if your battery’s pretty dead, and the battery you’re connecting to is fully charged (or especially being charged by the car running), that your current through the wire’s gonna be higher. There’s a possibility that you’d pop the fuse in the 12V socket in this case. If your battery is low, it’d be better to connect straight with jumper cables directly to the car battery (because jumper cables are very thick so their resistance is much lower and they can take more current.
(Geeky part: If you want to see how much current you’re pulling out of the car socket, you’d have to put the multimeter (on the ammeter setting) in series with the charge cable (and make sure the current isn’t more than your meter can handle. The safest way would be to just put a small resistor (1 ohm or so with a high current rating) in series with one of the wires and measure the voltage across it. Take that voltage divided by the resistance and you get the current through it.)
You can also find female connectors that will clamp on temporarily or connect permanently.

Let’s say you have some kind of outlet above connected somehow. With this, you can easily charge the system by just connecting it with a cable that goes from that female connector to your car’s 12V power outlet female outlet with something like this:

Keep in mind that 12V cables, especially thin ones like these, lose a lot of your power along the way. Always keep your DC wires as thick and as short as absolutely possible.
Solar
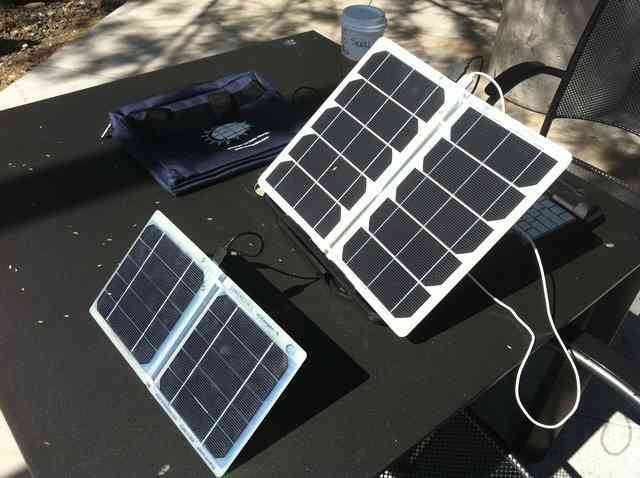
If you have sunlight available, solar is awesome because it’s free energy. The problem is that you have to have sunlight. A solar panel doesn’t do very well on cloudy days and does nothing at night. You also have to trade size for power with them. They tell you (very fuzzily though) their Wattage. The one I chose is a 13 watt panel. Watts are equal to Volts x Amps. That means that at full power rating, and 13V out, it’s putting out about one amp.
To know whether you have the right size, you should look at how much power you’ll be drawing. If you are pulling 100 watts from the system, 13 watts won’t keep up. But, that’s where the batteries come in. If you charge the batteries all day without using them, you could have 130 watts stored up in the system. If you run things all day and night though, you’ll eventually run out of juice.

I started out with a briefcase-type of foldable solar panel that I keep in my camper. It’s spec’d at 13 Watts, which means that at full sunlight, it should be putting out about an Amp.
Charge controller
If you have a solar panel, you’ll need to have a charge controller too, otherwise you could either overcharge your battery or burn up your panel. This is one of those things you don’t want to skimp on. The one I have listed below is on the lower end of things but it’ll get you started.

Here’s a quick video that gives an idea what they are, even using the version I used:
This particular solar charge controller is pretty small. It seems to work fairly well with this system but there are better ones out there. Good enough for my purposes though.
Now I just connected my outputs directly from the battery but you can connect all the outputs from the solar charge controller output if you want to but you’ll have to do some wiring since it just has the two soldered pigtail ends hanging off it.
Power stored
Battery

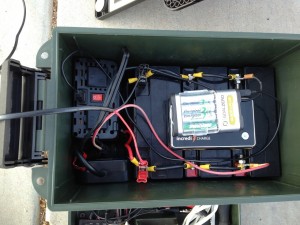
The choice of battery or batteries is a big one. The batteries will be the heaviest part of the system and could be the most expensive, depending on what kind of solar panel and inverter you choose. I chose three 18 AH (Amp Hour) batteries for my system because they fit inside the dry box I had and had enough power to do what I needed. There are better batteries out there you can get but this one’s not too bad and isn’t all that expensive.
When you’re looking at batteries, you need to look at the amp hours along with the size, weight and price. It’s really simple though. An 18 AH battery will run for 18 hours at one amp of output. It’ll then run 9 hours at 2 amps of output. By putting batteries in parallel (hooking up all the red connectors together and all the black connectors together), you then keep the system at 12 volts but you now can add up the amp hours. I have three of these in parallel so I get 18×3=54 amp hours from what I have.
Here’s the inside of the box. As you can see, the batteries are connected in parallel. The black box with the red switch is the inverter, and the smaller one below that is the trickle charger. Above the batteries are the AA charger and a USB battery:
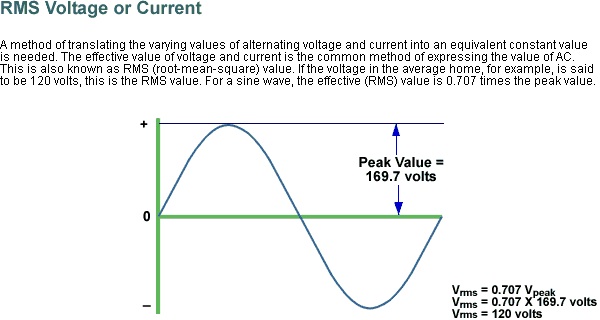
If you don’t know how many amps you’ll be drawing, you can calculate it by knowing the watts. The problem is that you need to know how many volta they’re using but it’s probably gonna be 12 or 13. Either way will get you close. If you have something that draws 120 watts at 12 volts, then you’ll be pulling 10 amps (120 watts divided by 12 volts = 10 amps). The nice thing about using RMS is that it then the math works for AC, because it’s the DC equivalent. If you have 110 watts at 110 volts, you’re drawing 1 amps.
(A more technical side note that you don’t have to worry about: you may have heard of Volt-Amps (VA). If your system doesn’t have a lot of capacitance or inductance, your current and voltage sine waves will be in sync so it’s the same thing as Watts. If there’s a shift in phase from your voltage and current, you’ll have what’s called a Power Factor (PF), which gives you the equivalent watts. A PF of 0.5 means 120 VA = 60 watts.)
You’ll probably want a dry cell battery because you don’t have to worry about acid dripping everywhere. Some kind of deep cycle battery works well because you can drain them lower without damaging them.
Just look at how many AH you really need, figure out what size battery (or how many batteries in parallel) you’ll need. Then look at how heavy that will be, what that costs, how big that would be, and what kind of connectors you want on the battery (top vs side for example). Then balance everything until you get what you want. Or just buy a decent sized battery and go with that.
Power out
AC
Getting 110V AC out of a 12V battery is pretty easy. You just connect an inverter to it. The red wire goes to the positive and the black wire goes to the negative.
- Inverter

The inverter is one of the things you really need to think about. They’re rated by two Watt ratings: continuous and peak. The continuous wattage tells you (kind of) how much power it can run if left on. The peak wattage tells you how much it can temporarily ramp up to. Some things like drills etc have a large draw when they turn on and then ramp down to a lower wattage.
AC means Alternating Current. That means that unlike DC, the voltage goes up and back 60 times per second in the US, at 110 Volts RMS. RMS means root mean square but I’m not gonna go into all that. Basically it just gives you an easier number to work with than the peak voltage would. If you hooked up the AC to something that would show you the voltage (like an oscilloscope), it would look like this:
The other big thing you have to consider is whether you want a modified-sine inverter, full-sine inverter or a grid tie inverter.
- Modified-sine
A modified sinewave inverter is the most popular type. Because they don’t massage the signal, you get AC from it but it’s a choppy AC. Some electronics don’t like that choppiness so you get noise in it. Also, if you’re considering running a CPAP machine with it with a heated humidifier, you can’t use a modified sine inverter.
- Full sinewave inverter
A full sinewave inverter puts out a much cleaner signal than a modified sine inverter. It’s also more expensive, larger and heavier for the same wattage.
- Grid tie inverter
A grid tie inverter is even more expensive. The bonus is that you can plug these into your system at home (if your laws allow it) and it’ll put excess power back to the grid. You may even get a credit from the power company for that power. It not only makes a purer signal, it matches the frequency of the grids power and shuts down if the power goes out so the powerline fixer dudes don’t get fried.
DC
There are many different kinds of connectors and ways to get 12V out to your equipment. Some are proprietary like the harness cable that goes to my ham radio and some are cables you can just clip to the battery terminals. The ones mentioned in the ‘Power in’ section can also be used as ‘Power out’ connectors, such as this one:

When deciding what kind of bolts/nuts etc for your battery, keep in mind that you may want to connect jumper cables or alligator clips from a cable directly to a battery for temporary use. Other things that you might want to have always connected, such as the inverter, would have to have an end on the wire that would be on the bolt as it’s tightened.
Different connectors can be used to solve certain situations. For example, if you wanted to connect something with an SAE connector end, and have it always connected to the battery or inverter (if they’re connected to each other, it doesn’t matter where you connect it), you’d use something like this:

There are a LOT of combinations so no reason to go through them all here but I’d at least have a 12V male and 12V female connector. That can give you a lot of leeway. For example, if your inverter doesn’t have a USB output, you could just plug in a 12V USB connector instead of using the AC adapter you might normally because it uses less energy. Just make sure the one you get has enough power to run whatever you’re charging with USB. The one below is 2.1 Amps so it should work on pretty much everything:

AA
One of the biggest changes I’ve made in my preps is to start converting all my battery stuff to AA. I always had CR123 before (because it’s an awesome battery and I get them through the military). The problem is that they’re not readily available. Pretty much every house in the U.S. has AA batteries if you had to start scrounging, and every place that sells batteries, sells AA.
One of the things I’ve added is an AA charger. There are many that you can use but this Goal Zero one gives you the added ability to charge the AA batteries with its own solar panel. I keep this in my go bag as a part of my unlimited bug out electronics power supply setup. I love this setup:

I actually use a Suntactics scharger-5 instead of the goalzero one. I’ve had it in several countries and it always performs. If you use the scharger-12, you get two USB panels.
If you have things that take D batteries, like the lantern I use, instead of paying for rechargeable D batteries, It’s much cheaper to just get AA to D adapters and use them. They won’t last as long as D batteries but they work pretty damn good:

Portability
- The box

To make the thing portable, you need some kind of box. You probably want to choose this last but you may have something in mind that you want everything to fit into, such as a cubby-hole in your camper or something that you can’t change. I chose a dry box that I had lying around.
Since the box itself is currently about 42 pounds, I picked up a luggage cart. It’s rated for 75-80 pounds so it’s no problem to put the solar panel and box on it to roll it around. If this were a more permanent thing, I’d be looking for one that has bigger tires.

Monitoring and maintenance
- Kill-a-watt
One thing you should consider if you’re doing any kind of solar/wind/whatever stuff is a Kill-A-Watt monitor plug. You will use this thing for all kinds of things.

You just plug it into the wall (or your inverter AC output) and then plug something into it. It then tells you how much watts/amps your item is actually using. It’s an awesome thing if you’re looking at hooking up several things like a fridge, air conditioner and lights on a camper using AC instead of DC. (Do yourself a favor though; Things almost always actually run on DC but convert the AC into DC inside. If you can find things that run on DC already, you won’t be wasting energy converting from 12V to AC and then back from AC to DC inside the thing.)
- Multimeter
You should have some kind of way to measure the voltage of your batteries so you know how much you have left. A decent rule-of-thumb is things stop working about 10.5 volts. A multimeter will allow you to easily check the voltage, plus troubleshoot things like bad connectors or faulty equipment.
There are plenty of $5 multimeters out there but they’re all crap. Spend a little extra if you want it to actually work. Just make sure it fits in your box so it’s there when you need it.

If you really want to get fancy on your DC output, a meter like one of these “Watt’s Up” ones are awesome:

As I mentioned before, keep a set of all the tools you’d need to fix or replace any part of the system. You at least need the wrenches needed to take the batteries out. You might also want some extra wire, wire cutters, wire connectors, a connector clamp, and whatever else, depending on what all you decide to have.
So, as I said, this is a pretty flexible system so don’t feel like you have to do it the way I did. Use what you have laying around and what you can find wherever you’re at. The basics are all the same: get 12V into the batteries to charge them somehow and get AC out with an inverter. Using various connectors can also give you 12V out, including USB.
So as I mentioned, in case you’re looking for what to get me for Christmas, this freaking sun-tracking solar briefcase rocks! Watch this video…


This is the first video that really explains things I’ve seen. TY…Want the briefcase too…
The briefcase solar panel is really convenient but I wish the magnets that hold it closed were more powerful and the legs that pop out would latch in better. Other than that, I like it.
Question, why 3 little batteries vs one Marine deep cycle?
In my case, it was because I wanted to have a system that I could scale up or down easily. If I need a smaller unit, I can just use one battery. Also, at the time I was looking, the balance of size, weight, power, and cost were slightly better by getting what I got.
Another great article, and i am doing very similar myself here in Thailand for my own camping/bug out trials etc. My new home will also be 100% off the grid via both solar and wind turbines on 8,000 square meters I own, then more i can use….. Cheers Allan Leigh
Nice. You should take pics and write up some articles.
I will certainly try to write up facts only of my personal endeavours; bearing in mind this will be for camping/bugging out scenarios. Given my long term, plan is to bug in to a very well defended home, in mostly rural Thailand. But any planned article will be a few weeks away. With my being rather busy after 3 weeks back in Australia, and having my dream home built; which never goes according to plan of course….But these things said; I will get back out shortly with my Pit Bull and off road motor bike, to scout out alternative travel options.; along with test out new gear I obtained back in Australia…..Cheers Allan Leigh
This is very good knoweledge you are presenting. Though if the power goes totally out due to an EMP from sun or nuclear sky blast you better have some good metal trash cans with tight fitting tops to store all this electronics in till you need it or it will be toast. Basic…only nothing with transistors or resistors or otherelectronic componets will survive. Now the old tube radios and TVs I believe will survive.
True but that’s such a slight possibility compared to all the hundreds of much more likely scenarios to happen. Besides, even if it does happen, you just use it up until that point, and then from that point on you sweat. No big deal.
I really like your site having just stumbled across it I will be making one myself I was wondering have you thought of trying to make a small portable wind turbine to plug into this pack to make it truly portable and diverse? Just a thought I will be trying this myself that way at night or cloudy day it might charge some.
Thank you for breaking this down. Solar energy and electricity can seem very complicated. Most people have had electricity delivered to them, they have never had their own power plant before. You explained it very nicely and you got right to the point.
Have you had any issues with the Cobra inverter causing interference in your electronics?
I haven’t but I don’t use it for anything that would get interference.
Hi, I recently was given a ICP Global Solar Panel and I’m hoping to use it while camping. I have a 300 Watt Power Inverter too. I just read your information and I’m confused as to what type of battery to buy for this? On the back of the panel it says the System Volt Max is 50 and the WP is 15 Watts. The person who had it ran a trailer with it and all I’d like to use it for is charging cell phones. Can you help me out as to what kind of battery to buy? Thanks for your help!
I’m assuming you have this panel: http://amzn.to/1p0TNhl
What you want is a deep cycle battery of some sort. Golf cart batteries, forklift batteries, etc. Something called an AGM battery (absorbed glassmat) is a really good choice but they’re more expensive. They last longer though. This is a great choice: http://amzn.to/1uGX5uE
What you need to look at is the quality of the manufacturer and type if you stray from that kind. The AH (Amp Hours) of the battery is very important because it tells you how long you can run it with it drawing an amp of current. Also look at the weight of the battery and the size to make sure you can physically use it where you need it.
You technically can just use any old car battery for the most part but they’re not designed for that kind of use.
Make sure you have a good charge controller. That’s the thing that will keep your battery from overcharging and can make it charge better. Don’t skimp on a cheap one, they have a tendency to break.