 PVC hand pumps explained
Obviously, water is one of the biggest considerations if things go South. You can only go about three days without water before you die and for some reason the books that tell you that don’t emphasize the fact that you’re more likely to die well before that because your brain stops working correctly the more you become dehydrated. Add to that the headaches etc that you have to deal with from dehydration and it’s a recipe for disaster.

Just about as obviously (I didn’t want to start this paragraph with the same word so I threw in a qualification statement in there), you need to filter the water that you get before you can drink it. I’ll be writing several articles later on different ways to do that but before you can filter your water, you have to collect it.
You may be thinking that this is just an article about desert survival or somesuch nonsense but you’re wrong. You’re in a much larger danger of not having water than you think.

Water pressure exists in your house because the water company pushes it to you, unless you have your own well. In those cases, you probably use electricity to push it to yourself. What a lot of people don’t know is that if you lose electricity, you lose water pressure. If you lose water, not only will you dehydrate, you lose the ability for proper sanitation and waste management which causes disease. You’d still need to find a water source. Some are kind of hard to reach so being able to just drop a hose down into it (like a steep riverbank edge) makes those ones a lot easier to work with.
Plus, you may just need to make something that can manually pull water out of a basement or boat. Essentially, this should work anywhere you need to move a decent volume of water from one place to the next. Due to atmospheric pressure etc, you can only pull water up so many feet with it though.
There is hope though. In a lot of cases, water is available just a few feet away. You just have to get it out of the little hole and into where you can reach it. This is why they invented pumps. Also, if you happen to have the opposite problem and are flooded, you need a pump to get the excess water out and you might not have electricity.
So how can you move a decent amount of water for an extended period without using electricity if you don’t have one of these fancy hand pumps for a well?
Enter the manual water pump.
Obviously, you could just go out and buy a manual pump but not only would that not be as much fun as making one yourself, it may not fit your exact needs, and you may not have a store available. You need to know how a simple water handpump works and how to make one. I’m here to help.

As you probably already know from reading my site, I’m all about understanding the concept about things and adapting to the current situation instead of just learning a way to do something that may not help when you need it. It’s no different with making a hand-powered water pump.
The key to a pump like this is the check valve. It’s ok if you’ve never heard of a check valve – I’m about to walk you through it.
A check valve’s purpose in life is to allow water or air to go in one direction but block it from going the other way. It’s the physical equivalent of a diode.
For a pump to work, you need a hose to come out of where your water is (which is attached to the INLET) and a hose to where it’s gonna go (which is attached to the OUTLET). Between the two is some way to move the water. Moving water’s easy but if you want to do it super-simple, you need to use a pump kind of like a bicycle tire pump. Those pumps just go up and down. If you don’t have a way to allow water to come in one way and out the other, you’ll just be pumping water in and pushing it right back out where it came from.
The hand pump concept:
There are only three components that make up a hand pump: the piston, the inlet check valve, and the outlet check valve. The key is how to make each of them. You need water to flow in one direction and not the other. A check valve is designed to do just that.
One check valve is in the hose from your water source to your pump. It lets water be sucked through the hose to your pump but when you push it back out, it clogs up and doesn’t let it go back through.
The other check valve goes from your pump to wherever you’re trying to put your water. It allows you to push water out of your pump but doesn’t allow it to be sucked back in when you pull up on the lever.
I made these images from Powerpoint so don’t laugh.
How does a check valve work?
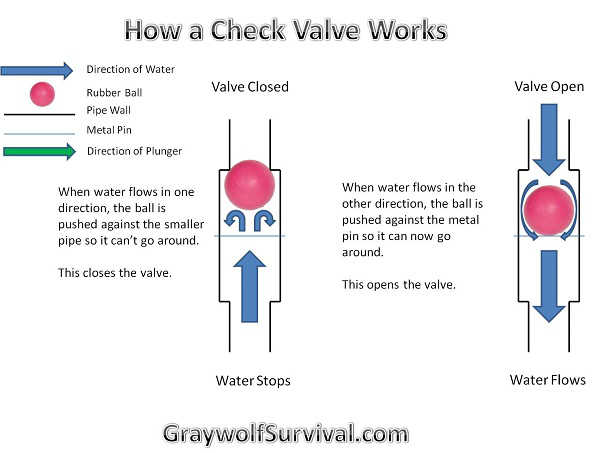
The key to this whole operation is the check valve. If you have two of these then all you have to do is come up with a way to pull and push water through them to make a pump.
A very simple way to make a check valve is to have a tube of some sort. In this tube is a ball. One end of the tube is slightly bigger than the ball so water (or air) can go around the ball with no problem. Somewhere in the middle of the tube, it narrows so the ball can’t go through it. In fact, for it to work, it has to press up around the edge so if water (or air but I’m not gonna keep saying air so just pretend that I am) goes toward the direction of the narrower part, the ball gets sucked against the narrower part and blocks the hole.
That’s pretty much the concept of a check valve. For practical use, you might want a couple of other additions.

Since a ball may not make a complete water-tight fit to the narrower pipe, sometimes a rubber o-ring is put around the smaller section so the ball presses against it. This is especially important if you have a hard ball like a ball bearing. If you have a softer ball like a bouncy-ball, it’ll form itself to the shape of your smaller pipe and seal better.
One problem with having a flexible ball in your check valve is that if you have enough pressure, your ball may get sucked down into the smaller hole and not come back out. There are two ways to stop that. The easiest and most common way is to make sure the smaller pipe inside the check valve has a hard edge to it that doesn’t allow the ball to enter. If it’s sloped, it’ll get stuck easier. Another way to do it is to put some kind of blockage in the smaller pipe so the ball can’t go in past a certain point. That’s a bit harder to make work but may be necessary in some circumstances. There are lots of ways to do this that’ll work.
The other key element to the check valve is that when the valve is open and the water is flowing from the narrower end toward the wider end and around the ball, the ball will want to follow the water down the larger pipe. If this happens, it’ll take too long for the ball to get back to where it blocks the water from going the other direction so your pump efficiency will suck. To stop this, you need a way to stop the ball from going down the tube very far but still allow it to break free from where it’s sealed at the beginning of the narrow part.
A simple way to do this is to go back an inch or so from the center of the ball and poke a stiff wire or pin through the large pipe, sealing the points where it goes into the pipe. This allows the ball to move toward the larger end as the water flows that direction, thereby opening the valve, but the pin stops the ball from going too far. Not only does that stop the ball from clogging up stuff where it shouldn’t, it keeps the ball near the narrow end so when the water reverses direction, the ball immediately closes off the flow. If you don’t put it in the right place, it’ll either not let the ball leave where it seals or it’ll let it go down so far that you end up pushing water for a while with each pump that goes back from whence it came.
The plunger (piston) section explained
The pump is a bit easier to understand. All you need is a tube that has a decent amount of volume in it and put another sealed tube inside it that squeezes against the sides. The sizes all depend on what you have available and what you can physically push and pull. The hard part is creating a good seal that doesn’t stop you from pushing and pulling the inner tube inside the outer tube.
Obviously, on one end of this inner tube, you need a way to connect to whatever is powering your pump. In this case, it’s your burly hands doing the work so the easiest way is to put a T at the end and make a handle like a manual bicycle pump has. You could just as easily (ok, maybe not as easily but follow along) attache the end of the pipe to a wheel with a connection that can flex, allowing a bicycle or engine to power it. But that’s another story.
As I mentioned, the inner pipe has to fit tightly against the outer pipe so the water you push and pull doesn’t squeeze out between the two pipes but still lets you easily move it. One way you could do this is to cut a couple of grooves in the inner pipe and put a couple of o-rings in the grooves. It may take a couple of attempts to get the sizes correct but it’s not too difficult to figure out.
Another way to seal the inside of the pump housing but make it move is to cut out something like a rubber tire or sandal into a circle just a hair larger than the outer tube and put this on the inside end of the inner pipe. The rubber will press out against the outer pipe just like the 0-rings do. In a lot of cases, this is easier than trying to fiddle with o-rings and the parts are easier to get. You could also use a cork on the end of the inner tube if your sizes match up.
Theoretically you could just use two pipes that fit so well that they seal but I’ve never been able to make that work.
So how does the pump work?
Let’s start with the pump pushed all the way into the pipe. Obviously, the first step is to pull up on the plunger.

As you pull the inner pipe/tube/pvc/whatever out of the larger one, water is sucked up into the piston. This is because you have a seal of some sort. Pulling on the handle pulls the plunger into the piston and creates a vacuum inside the outer tube which is most likely more pressure than what’s holding your water. You need to make sure that your feed tube isn’t too long or too high above the water so that this is the case. As you pull then, the water is sucked from your water source through the feed tube and up into your pump.
Because you’ve put your first check valve in the right direction, the ball inside is pushed away from the narrow tube inside it and toward the wire, allowing the water to flow around it. The check valve in your exit tube is put in the opposite way so as you pull up on the pump handle, this one is sucked up against the smaller tube inside and seals the exit. Otherwise you’d either suck up air into your pump or water from the place where you need it to go.
So at this point, your pump is now full of water. Let’s push the plunger back down.
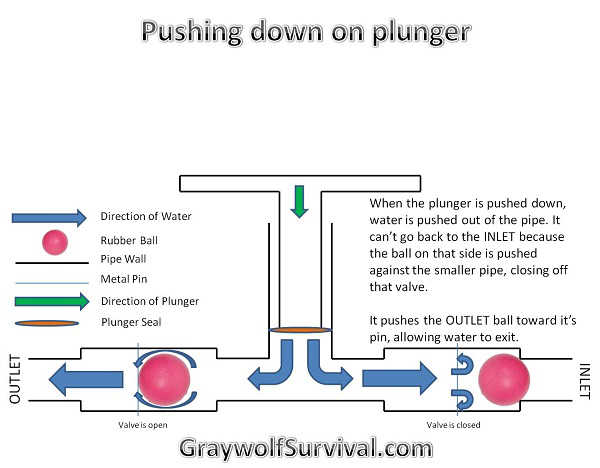
As you push the handle back down again, the water in the pump is pushed down back toward your input and exit tubes/pipes/hoses. This pressure moves both of the check valve balls away from the pump. Because the inlet valve is situated correctly, it is now pushed up against the smaller pipe inside and seals off water from going that way. Otherwise you’d be sucking water from your source and pushing it right back again. The other check valve ball is the opposite direction so it now moves away from the smaller diameter pipe inside the check valve and toward the wire that stops it from going to far. This water that’s being pushed out of your hand pump is then allowed to flow around that ball and through the exit tube.
Rinse and repeat.
So now let’s look at a video so you can one way that you could actually build one of these using this concept.
That’s really all there is to the theory of how a simple hand pump works. Almost all pumps out there are variations on this theme. If you understand this basic theory, you can make all manner of pumps.


Wow, I’ve only read a little bit on here so far, but am completely interested in learning more. I think that the average American takes a lot for granted and has forgotten how to take care of themselves. Best case scenario: we never have another world war, inflation goes away, government minds their own dang business, cost of living matches what we earn, yada yada yada. But I don’t see that happening, especially the inflation and government. That being said, I may be an old fart by some peoples standards, but I’m damned if I’m gonna let my grandchildren’s quality of life be in jeopardy because I’ve taken too much for granted. What happens if we the American people lose the ability to use modern technology? What happens if electricity gets so dang expensive we can’t afford it? What happens if we can’t trot our happy backsides to the local grocery stores? Well, a lot of us would be screwed! So, what are we all going to do about it? Are we just going to sit on our duffs and wait for someone to come up with a solution? Ya, that went so well for the American people so far eh? I would like, no, I am going to learn to be a self sufficient as possible; grow and raise my own things, learn to contruct solar panels or wind turbines (something anything to provide my own electricity); I am going to learn to be as self sufficient as humanely possible.
Great ideas
These concepts do not only apply to Americans but to the citizens of every modern 1st world nation. We all need to re learn the old self sufficient ways and stop looking for others to provide for us from the womb to the tomb.B
I am a realist and I can read between the lines and what’s going on in the world and I really do think that the world is in for a very shocking new episode and it will not be life as we know it I would like to be as prepared as I possibly can I read your article about making a hand pump for water I have an electric well and I will be gathering the materials that I need to convert to a manual hand pump. I wish this wasn’t so the predictions I’m not a religious nut maybe I won’t want to survive when it really does happen but least I could leave this for somebody who follows me thanks for your help good luck to you
I’ve tried these types hand pumps and check valves several times and I can’t draw water more than 30 or so feet. So what do you do when static water is 70 feet!? I see many advertised, physics indicated they won’t work unless your pump is at the bottom of the pipe.
Know how – tell me!
Yeah, the problem is that if you’re pulling it up, you’re fighting gravity/air pressure. At about 25-30 feet, you’d have to have a pump that’ll actually lift the water up or push it up. Here’s a little more info … http://bisonpumps.com/all-things-hand-pump/
A check valve/foot valve, must be used to maintain a prime. Initial priming may be needed. Could be done with siphon pump and valve then connected to the water pump
Thank you for sharing your expertise, much appreciated
i have old well with 6in casing stat water lev is 40 feet well is 70ft deep the old davey pump head is an great shape but the cylinder is cast with 3 in leather and is 12 in long and cant find the parts can anyone help me out thank you
We now have a fairly easy system for repairing your tennis elbow trouble with the quick remedy.
I appreciate your comments. However, I must take exception with one detail. The idea that you die in three days without water is an urban legend without basis. Many people, myself included, have survived beyond three days with no food or water — absolutely none — without any problems at all. I got hungry and thirsty, and had less energy, but that was all. I would do it again without any qualms or fears, if I had to.